Friday, October 17, 2025

Free from Generac with Genmon

Background

Earlier this year, in the spring, my house backup standby generator died. It was pretty old, and the generator company diagnosing it determined it was likely the rotor or stator, both of which were not worth the cost to replace. They installed a new generator for me, a 10 kW from Generac.

Generac's standby generators currently come with their Evolution 2.0 controller. Being a home automation and general tech enthusiast, I was delighted when setting it up to see that it could connect to my Wi-Fi. Connecting it unlocks access through their website and an app where you can view information about your generator. Though setting it up and seeing basic information was free, I was immediately presented with an option to upgrade to their Premium subscription service, which enables real-time alerts.

Generac Cloud Integration

This was pretty disappointing. I just spent thousands of dollars on this appliance and it comes with free web and app monitoring, but push notifications are locked behind a subscription service? Kind of a ridiculous, but not a big deal, I thought, if I can bring the generator into Home Assistant, since I can easily send push notifications to my phone myself using an automation. After looking around, I found the ha-generac Home Assistant integration.

I was able to install the integration, make a nice dashboard that displayed my generator information, and wrote a simple automation to send me a push notification whenever the generator status changes. Problem solved. I had this running for a few months before a problem cropped up related to authentication failures. I started looking more into how the integration works.

The integration uses Generac's website API, which is a restful-like JSON API. There's no official documentation for it: people reverse engineered the API by looking at the resources loaded when you load their website. It's a fairly simple API and looks easy to use. The authentication process was even reverse engineered, making it easy to log in via Home Assistant. Unfortunately, around August 2025, Generac changed their authentication process to require clicking a "I'm not a robot" box, which breaks scripted logins like Home Assistant's.

The integration's maintainer, Jose Santiago, was able to keep the integration working by documenting a workaround where you have to log in to the website and copy a session cookie into your Home Assistant configuration. While this works, the cookie does seem to expire seemingly randomly, requiring the whole process to be executed again. By this point, I was pretty frustrated with Generac and started looking for alternatives.

Genmon

After doing some research, I came across genmon. It's a free, open source generator monitoring application designed to run on a small device like a Raspberry Pi. After I read through the documentation, I was honestly a little overwhelmed. Setting it up looked daunting, and I wasn't entirely sure I wanted to start messing with the hardware of the expensive generator I just purchased.

I was feeling pretty spiteful at this point though, wanting to free myself from Generac's locked cloud service. I read more and determined that all I needed was a little adapter board for a Raspberry Pi called a HAT (Hardware Attached on Top). I already had a Raspberry Pi 3 lying around that I wasn't using and I found a premade kit that comes with the Molex connector to plug into the generator and terminals for powering the unit via the 12V battery, all for $65:


I fired up my 3D printer and printed a case for it from here. It almost fit, but I had to cut some extra space to get the connectors to be accessible:


I installed Raspberry Pi OS on it, installed the genmon software, plugged in a USB wifi adapter, and made sure it was accessible. I was ready to install! It ended up being much easier than I had thought. All I had to do was unplug the generac unit from the Molex slot and plug in the Rapsberry Pi instead:


Then, wired in the included terminals to the 12V battery:


and it was all ready to go:


I tucked it up inside the generator, closed it up, and had data coming in via the genmon web port.

Home Assistant

I'm a huge fan of Home Assistant, so I did want to get this data into my Home Assistant instance. This would allow me to integrate the data into my home dashboards and also set up an automation to send my phone a push notification on status changes.

There is a genmon mqtt addon that will publish data to an MQTT server. I already had the MQTT addon server running in Home Assistant, so all I had to do was configure a username and password and quickly got it connected.

Unfortunately, while the data was being populated in MQTT, I only found scattered, incomplete YAML files for configuring MQTT sensor entities in Home Assistant for genmon. I ended up creating my own and published instructions for setting it up here. I set up the push notification automation and built a nice little dashboard:


Conclusion

Everything's working great now, and I love that it's fully local to my home network without any cloud dependencies.

I do want to get on my soapbox for a bit and voice my strong disappointment with Generac here. I'll first say that I'm not anti-cloud. I use many cloud services and even have several cloud-based integrations in Home Assistant. I also pay for several subscription services, when I feel they're adding value.

In this case though, Generac is blocking third parties from using their cloud service, even if you have a paid subscription. It's the MyQ fiasco all over again, and companies keep making this mistake.

I get it though, I really do: it costs money to run cloud services, companies are looking to recoup those costs, and obviously they want to make money. And people like me are not the majority demographic using these services. I think their strategy though is fundamentally flawed. What these companies fail to realize is that enthusiasts like me are your evangelists if you get it right: we write blog posts, we make YouTube videos, and we recommend products to our family and friends. Pissing us off doesn't help your product.

I don't like to give criticism without suggesting alternatives, so here are two ways Generac could have done better here:
  • Add third-party OAuth support to your APIs. You can even require a paid subscription to enable it, but give people access in a secure way to your APIs. You don't even really have to worry about backwards compatibility: the open source community will just patch things when the API changes.
  • Allow access to the Generac wifi module on the local network. If you open up a port that serves the device's API, people can connect to it locally on their network (e.g. from Home Assistant) without any reliance on your cloud service at all. And this really doesn't impact your revenue since the goodwill from the community will likely outweigh the tiny loss of subscribers from small fraction of people who actually want local access.
Some examples of companies doing this the right way:
  • TP-Link's Tapo cameras, which have a cloud based subscription service but also open up their cameras on your network via the open ONVIF protocol, if you enable it.
  • TRMNL, who provide a cloud hosted service for managing an e-ink display, but they also publish their entire server suite on GitHub if you want to host it yourself locally.
Here's to hoping that more companies start doing better.

Wednesday, January 29, 2025

Fully Local AI Vehicle Detection

Intro

You know those old school driveway alarms? The ones you can put at the end of your driveway, which make a chime inside your house go off when a vehicle crosses them? You know: the ones that end up going off when a person walks by, a squirrel runs nearby, or the wind somehow sets it off for seemingly no reason? Well this is my take at a modern, high-tech version of that.

Let me start with the fun part: a demo of the finished product (make sure to turn sound on):

What you're seeing here is a TP-Link Tapo security camera halfway down the driveway detecting a vehicle has turned into the driveway using AI. The camera sends a push notification to Home Assistant, which then sends out a message to a Home Assistant Voice and a Google Nest Speaker (cloud dependent, for comparison).


Hardware

  • TP-Link Tapo C325WB - Tapo is fast becoming my favorite camera line. It has local 24/7 recording to a microSD card, supports the open ONVIF camera protocol, implements the RTSP streaming protocol, has a local AI model with person, pet, and vehicle detection, and has an optional subscription service for cloud clip upload/backup.
  • Beelink EQ14 Mini PC - Intel N150, 16GB DDR4, 500GB M.2 SSD - this is running Home Assistant. It's overkill for what I need here, but these N100/N150 boxes are really great!
  • Home Assistant Voice Preview Edition - the recently released smart speaker from Nabu Casa, the company behind Home Assistant. It supports fully local control, which is why you hear the message on this speaker first.
  • Google Nest Mini - the second (lower) speaker that announces the message after a several second delay, since it's the only cloud-dependent (optional) portion of this automation.
  • Deco X50-Outdoor - the Wi-Fi AP mounted to the outside wall of my garage that the camera connects to. Since the camera is powered from a lamp post halfway down the driveway, I don't have an easy way to run a hard wired data connection. I've found the Deco APs to have great range, and the C325WB's Wi-Fi radio seems to have a fairly stable connection.
  • Vertical Pole Mount - to mount the Tapo camera to the lamp post.
  • 3D Printed Stand for the HA Voice - special shout out to RuddO for making a great 3d model for the speaker stand.
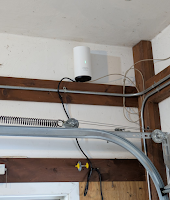
Here's a view of the camera mounted on the lamp post and the AP mounted in my garage:

Deco X50-Outdoor mounted inside garage

Software

  • Home Assistant is the core of this automation, receiving the events from the camera and sending events out to the speakers. Home Assistant has become incredibly popular and has an integration for almost everything at this point. I highly recommend it as the best home automation platform.
  • Home Assistant ONVIF Integration - Open Network Video Interface Forum (ONVIF for short) is an open industry standard for controlling IP-based cameras. One of its features is event detection, where it has both a "pull" protocol and a "push" protocol for getting events from a camera. In this case, vehicle detection is one of the events sent out by the Tapo cameras.
  • HomeAssistant - Tapo: Cameras Control / pytapo - An integration that adds much more functionality for controlling Tapo devices over the base ONVIF library built in to Home Assistant.
  • Piper - the text to speech (TTS) system developed by the Open Home Foundation. This is a very fast, fully local TTS engine which I'm using to convert "vehicle in driveway" to speech that can be sent to a speaker.
  • Chime TTS - An integration that can combine sound effects and TTS audio to create a combined output. I'm using it to add the little "chord" sound that plays just before the "vehicle in driveway" message on the Home Assistant Voice speaker.
  • Google Assistant SDK - An integration for Home Assistant that allows connecting to Google Nest speaker devices. With this integration, you can send a broadcast to one or more speakers. Unfortunately, this is the one component that requires the cloud, which introduces a delay. It also adds an "Incoming broadcast: it says:" prefix before the "vehicle in driveway" message, which can't be removed. It also doesn't allow specifying a volume for the message. All of that combined makes this pretty unfortunate, because I have several of these around my house.

Coding

It wouldn't have been as fun of a project if it all worked out of the box, right? When I pulled in my Tapo cameras to Home Assistant, I noticed that they had a binary sensor for motion detection but not the more advanced person, vehicle, and pet detectors. The motion detector also didn't seem to be working properly.

I started looking into home assistant logs and noticed a strange 500 error communicating with the camera using ONVIF:

illegal status line: bytearray(b'POST /onvif/service\x00HTTP/1.1\x00\x00Host\x00 192.168.56.109:2020\x00\x00Accept\x00 */*\x00\x00Accept-Encoding\x00 gzip, deflate, br\x00\x00Connection\x00 keep-alive\x00\x00User-Agent\x00 ZHTTP/1.1 500 Internal Server Error'

What's going on here? If you remember above I said that ONVIF has two delivery mechanisms in the events spec: pull and push. The pull method is similar to HTTP long polling, where you send a request to the camera asking for recent events along with a timeout (e.g. 60 seconds). The camera responds when it has an event to deliver or times out after the 60 seconds with nothing. With push, you give the camera a URL to send HTTP messages to when an event occurs. Push is faster and more efficient, but requires more set up on the client.

The Home Assistant ONVIF integration tries both but prefers push. If it can't set up a push notification, it falls back to pull, and this 500 error was happening while trying to set up a push notification. The camera was responding with a 500 error that wasn't even valid HTTP, containing null bytes as a separator instead of newlines.

To debug this, I installed an independent ONVIF client from Happytimesoft to see if it worked, and it did! I used Wireshark to capture XML payloads from the two clients to compare them and see what might be different that triggered the 500 error. Eventually, I figured out the camera's XML parser was not happy with inline namespaces such as <ns0:Subscribe xmlns:ns0="http://docs.oasis-open.org/wsn/b-2"> vs. defining the namespaces at the top of the document and using shorthand in each element, e.g. <wsnt:Subscribe>.

I sent a pull request to set a namespace prefix in python-onvif-zeep-async, the library used by the Home Assistant ONVIF integration, then a pull request to Home Assistant to pull in the updated version of the library.

I'm not sure why, but the Tapo cameras don't seem to send events reliably (or at all) when using a pull subscription. Push subscriptions got me up and running, receiving motion events reliably in Home Assistant. Next up, though, the ONVIF integration has a parser library that parses events to turn them into sensors. The ONVIF events spec is intentionally wide open in terms of the event payloads. I found this message in the log telling me that the event coming from the Tapo camera wasn't recognized:

clipped for brevity
Driveway: No registered handler for event from tapo_controltapo.driveway.c325wb.lan: { ...  'Topic': { '_value_1': 'tns1:RuleEngine/TPSmartEventDetector/TPSmartEvent', ... 'Data': { 'SimpleItem': [ { 'Name': 'IsVehicle', 'Value': 'true' } ... }

Okay, easy enough, I thought. I found the parser module that looked easily extensible to add more types. Unfortunately, it had no unit tests, which made it very difficult to test new parser types. A debugging workflow that includes getting into my car to drive down the driveway clearly wasn't going to work. So I added a new unit test for event types (which took a while to get working!) and sent a pull request to Home Assistant.

Conclusion

Yes, it's a little silly, but I think it's a great demonstration of the power of open protocols, open source code, and local processing. Like many in the home automation community, I value having local control of my smart devices. We often hear that cloud services are required to enable powerful features, but by carefully selecting the hardware components you buy and the software components you run, you can unlock impressive building blocks! Most importantly, I had a blast working on this and learned a lot along the way.

Thursday, June 06, 2024

A Home Office Status Light

I'm a proud member of the post-covid work from home crew. I love working from home because of two main aspects: first, I have an office with a door that closes, a large desk with three monitors, and the peace and quiet I need to do focus work. Second, it gives me enormous flexibility to choose my working hours, interleaving them with things like walking the dog, meeting with a contractor, picking up the kids from school, etc. And of course, it allows me choose where I live without having to worry about wasting time commuting.

The entrance to my office is a pair of french doors with glass panels so you can peek in at what I'm doing. But my monitors face an opposite wall, so you can't see what's on my screens. Because of that, there wasn't an easy way for my wife and kids to know if I'm in a meeting where I don't want to be interrupted. They'd knock or wave at me through the window until I responded with a thumbs up or thumbs down.

Here's my solution! A small light on my desk that turns red when I'm in a meeting, green when I'm not, and turns off when I leave my desk.


To do this, I leveraged my favorite home automation platform, Home Assistant. I split up the project into two parts: the detection sensors and the signaling. The signaling part was easy: I connected a Sengled Zigbee RGBW A19 bulb to my network and named it "Jeff's Office Status".

The detection part was more difficult. The easiest approach I could find would be installing System Bridge. However, I had some security concerns with installing it, and I had a tough time even trying to run it. Eventually, I realized it doesn't support getting the camera status on Linux anyway.

I decided to write my own little script to do the sensor detection and send the results using the Home Assistant REST API. I did some research on how to detect if the camera is turned on in Linux. Unfortunately, I couldn't find any event-driven way to do it, so the best approach I came up with was to poll the sysfs file /sys/module/uvcvideo/refcnt. The contents of the file changes from 0 to 1 when the camera is turned on.

I similarly didn't find an event-driven way to detect if my monitor is on, so I went with a polling approach by running the xset command with the -q parameter. It spits out a bunch of human readable text, which includes the string "Monitor is On" if the monitor is on.

I wrapped it up in a Python script that polls both the camera and screen every 5 seconds, posting to Home Assistant whenever the value changes from off to on or vice versa. I added the script to run under systemd so it's always running on my work machine.

Lastly, I created a Home Assistant automation that links up the two binary sensors with the color bulb. You can view both my Python script and the Home Assistant automation yaml file at my Office Light GitHub repo.

Sunday, December 10, 2023

Google Calendar E Ink Display

I've always wanted to display our family calendar in a central location, like in the kitchen. Various options exist, but a powered display really limits where you can place something, and I never liked the way it would look.

When I saw the OpenEPaperLink project, I had to try it out. Here's the end result:


The hardware I purchased for this:
These things are surprisingly affordable for what they offer. The rest of the project is all software, primarily Home Assistant. The more I've used Home Assistant, the more I'm impressed with the amazing community surrounding it.

The things I had to install in Home Assistant:
  • Google Calendar home assistant integration: this allows you to pull information from your Google Calendar, which imports it to home assistant as Calendar entities.
  • OpenEPaperLink home assistant integration: this detects the OpenEPaperLink hub on your network and adds devices for each of the displays. It then exposes a service call you can use to send data.
  • Home Assistant Node-RED: this integrates Node-RED into home assistant, which is a flow-based programming interface. It's much more flexible than Home Assistant's built-in yaml-based routines. In particular, it has the ability to execute JavaScript code during a flow, which is necessary to transform the data (more on this later).
Once this was all set up and configured, I could create the Node-RED flow. Here's what the overall flow looks like:


The first step in the flow is an Inject node, which is configured to trigger the flow once an hour.

The next step is a call service node which calls calendar.get_events. This is a new method, which replaces calendar.list_events, which doesn't seem to be documented yet. The parameters I pass get all calendar events in the next 4 days, starting from 3 hours ago:
{
   /* 3 hours ago */
   "start_date_time": $fromMillis(
      $millis() - 1000 * 60 * 60 * 3),
   "duration": {"days": 4}
}
The output gets piped into a function node. This is really the only code I had to write for this. Instead of inlining it here, I placed it in a gist here.

The script takes the message payload output from the calendar service call, parses the dates and times, has some special handling for multi-day events, formats the dates and events in a custom format, and then transforms it into the output payload format expected by the open_epaper_link.drawcustom service call.

Next, I wanted to prevent the display from refreshing unnecessarily. I piped the output of my function into a Filter node. This conveniently has a mode where you can stop the flow if the input doesn't change. E Ink devices only consume a lot of power when the display changes. However, the way the open_epaper_link.drawcustom service call works is it renders into an image, which then gets sent to the display. If you send the same image twice, it still consumes power. To prevent refreshing the display when not necessary, the whole flow gets stopped by this filter node if what's being displayed doesn't change.

The next step is a call service node again, this time with open_epaper_link.drawcustom as the target. The parameter this time is very simple, {"payload": payload}, since my function outputs in the payload format expected by the service call.

That's it! Now I have an auto updating E Ink display that shows my calendar. I bought a few more of these E Ink displays to play around with, so I'll hopefully be adding more!

Monday, March 11, 2013

Vaurien: The Chaos Proxy

I had a need to test out a program's behavior when its backend web server returned errors. Unit testing would have been difficult in this case, because I specifically wanted to test the program's macro result when encountering, say, 10% server response errors.

After searching around, I came across Vaurien, the Chaos TCP Proxy. It's seriously cool. As its name suggests, it's a TCP proxy server that you can route a local connection through to a backend server. In TCP mode, it can delay packets, insert bad data, or drop packets, testing the socks (pun intended) off your application.

It also supports the application-level protocols: HTTP, Memcache, MySQL, Redis, and SMTP, and its architecture is very modular, so it's easy to plug in new protocols.

For example, here's how I can run it in HTTP mode:
$ vaurien --protocol http --proxy 127.0.0.1:8888 \
          --backend www.google.com:80 --behavior 50:error
This says to run an HTTP proxy that connects to google.com on the backend and return a 5xx HTTP error code 50% of the time. Testing it out with curl:
$ curl --head -H "Host: www.google.com" http://127.0.0.1:8888/
HTTP/1.1 200 OK
...

$ curl --head -H "Host: www.google.com" http://127.0.0.1:8888/
HTTP/1.1 500 Internal Server Error
Content-Type: text/html; charset=UTF-8

$ curl --head -H "Host: www.google.com" http://127.0.0.1:8888/
HTTP/1.1 502 Bad Gateway
Content-Type: text/html; charset=UTF-8

Filed this away as a super useful tool.

Thursday, January 17, 2013

Git Branches by Date

I tend to create a huge number of branches in my git repositories, but I have a bad habit of not cleaning them up once I'm finished with them.

I found a nice command from an answer on StackOverflow that allows you to sort branches by date. I modified it slightly to also show the date when printing the branch information:

$ git for-each-ref --sort=-committerdate refs/heads/ --format='%(committerdate) %09 %(refname:short)'
Mon Jan 14 23:46:15 2013 +0000   keyfile-seek-rebase
Sat Jan 12 02:09:04 2013 +0000   perfdiag-mbit-fix
Fri Jan 11 17:38:13 2013 -0800   keyfile-seek
Thu Jan 10 01:05:43 2013 +0000   master

You can also set the date format to be relative (or other possibilities, see man git-for-each-ref):

$ git for-each-ref --sort=-committerdate refs/heads/ --format='%(committerdate:relative) %09 %(refname:short)'
3 days ago   keyfile-seek-rebase
6 days ago   perfdiag-mbit-fix
6 days ago   keyfile-seek
8 days ago   master

I added it to my .gitconfig file as an alias:
[alias]
    branchdates = for-each-ref --sort=-committerdate refs/heads/ --format='%(committerdate:relative) %09 %(refname:short)'

That allows me to just type git branchdates and get a nice listing of my local branches by date.

Monday, January 14, 2013

Google Cloud Storage Signed URLs

Google Cloud Storage has a feature called Signed URLs, which allows you to use your private key file to authorize access to a specific operation to a third-party.

Putting all the bits together to create a properly signed URL can be a bit tricky, so I wrote a Python example that we just open-sourced in a repository called storage-signedurls-python. It demonstrates signing a PUT, GET, and DELETE request to Cloud Storage.

The example uses the awesome requests module for its HTTP operations and PyCrypto for its RSA signing methods.

Monday, December 17, 2012

Google Cloud Storage JSON Example

I recently started working at Google on the Google Cloud Storage platform.

I wanted to try out the experimental Cloud Storage JSON API, and I was extremely excited to see that they support CORS for all of their methods, and you can even enable CORS on your own buckets and files.

To show the power of Cloud Storage + CORS, I released an example on GitHub that uses HTML, JavaScript and CSS to display the contents of a bucket.

The demo uses Bootstrap, jQuery, jsTree, and only about 200 lines of JavaScript that I wrote myself. The project is called Metabucket, because it's very "meta" - the demo is hosted in the same bucket that it displays!

Thursday, September 13, 2012

Bash Completion for Mac OS X

I've been using my Mac more often lately, and I realized I was really missing the fancy bash completion features that Ubuntu has. Turns out, it's pretty easy to enable on Mac with Homebrew:

brew install bash-completion

Then, as usual, homebrew tells you exactly what you have to do. Just add this to .bashrc:

if [ -f $(brew --prefix)/etc/bash_completion ]; then
  . $(brew --prefix)/etc/bash_completion
fi

Now you get fancy completion. Here's me hitting tab twice with a git command:

$ git checkout rdiankov
rdiankov-master          rdiankov/animation       rdiankov/animation2
rdiankov/collada15spec   rdiankov/master          rdiankov/pypy

Awesome.

Sunday, September 02, 2012

Comparing Image Comparison Algorithms

As part of my research into optimizing 3D content delivery for dynamic virtual worlds, I needed to compare two screenshots of a rendering of a scene and come up with an objective measure for how different the images are. For example, here are two images that I want to compare:


As you can clearly see, the image on the left is missing some objects, and the texture for the terrain is a lower resolution. A human could look at this and notice the difference, but I needed a numerical value to measure how different the two images are.

This is a problem that has been well-studied in the vision and graphics research communities. The most common algorithm is the Structural Similarity Image Metric (SSIM), outlined in the 2004 paper Image Quality Assessment: From Error Visibility to Structural Similarity by Wang, et al. The most common previous methods were PNSR and RMSE, but those metrics didn't take into account the perceptual difference between the two images. Another metric that takes into account perception is the 2001 paper Spatiotemporal Sensitivity and Visual Attention for Efficient Rendering of Dynamic Environments by Yee, et al.

I wanted to compare a few of these metrics to try and see how they differ. Zhou Wang from the 2004 SSIM paper maintains a nice site with some information about SSIM and comparisons to other metrics. I decided to start by taking the images of Einstein he created, labeled as Meanshift, Contrast, Impulse, Blur, and JPG:


The comparison programs I chose were pyssim for SSIM, perceptualdiff for the 2001 paper, and the compare command from ImageMagick for RMSE and PNSR. The results I came up with for those five images of Einstein:


As you can see, PNSR and RMSE are pretty much useless at comparing these images. It treats them all equally. Note that the SSIM values are actually inverted so that lower values mean a lower error rate for both the SSIM and perceptualdiff graphs. The SSIM and perceptualdiff metrics seem to agree on Meanshift and JPG, but have a reverse ordering of the error rates for Contrast, Impulse, and Blur.

To get a better idea of how these algorithms would work for my dataset, I took an example run of my scene rendering. This is a series of screenshots over time, with both the ground truth, correct image, and an image I want to compare to it. I plotted the error values for all of the four metrics over time:


Here we see a different story. RMSE and SSIM seem to be almost identical (with respect to their scale) and PNSR (inverted) and perceptualdiff also show similar shapes. All of the metrics seem to compare about equally in this case. You can find the code for generating these two graphs in my repository image-comparison-comparison on GitHub.

I think the moral of the story is make sure you explore multiple options for your dataset. Your domain might be different from other areas where the relevant algorithms were applied. I actually ended up using perceptualdiff because it gives a nice, intuitive output value: the number of pixels perceptually different in the two images, and because it supports MPI, so it runs really fast on machines with 16 cores.

Wednesday, August 22, 2012

How I Write LaTeX

I've been really happy with using the TeXlipse plugin for Eclipse to write my LaTeX documents. There are some really awesome features, so I thought I'd highlight some:

LaTeX Context

TeXlipse knows all the LaTeX commands, so you get auto-completion when you start typing:

Document Context

TeXlipse keeps an index of labels and references, so if you try and reference or cite something that doesn't exist, you get a warning:

It even has auto-completion for these labels too:

Bibliography Folding

The editor is full of little things that make your life easier. For example, you can configure bibliography files to be folded by default when you open them. It makes it much easier to navigate the document:

Spell Checking

TeXclipse can use the aspell command, or you can download a dictionary file and get instant feedback as you type:

Continuous Compiling

TeXclipse runs pdflatex (or you can use latex+dvipdf, pslatex+ps2pdf, etc.) in the background after you save a file. It knows how many times to invoke the compiler so the document gets built properly. If you have the PDF document open, most viewers will automatically reload the file when it gets changed, so you get instant feedback on how the final document looks. It also has the option of using Pdf4Eclipse, a PDF viewer that runs inside Eclipse. What's really nice about this is that it uses SyncTeX to connect the PDF with the original source files. You can double click on something in the PDF and it jumps directly to the source that generated that part of the document. It makes it really easy to make quick edits while reading the PDF.

Makefile

Since I usually collaborate with other people that don't use Eclipse, and in case I want to build the project outside of Eclipse, I also use latex-makefile project. This Makefile is amazing. You don't have to configure anything. You just drop it into the source directory and everything magically works. I can't recommend this enough.

Tuesday, July 24, 2012

Gigabit Hack Weekend

I went to a gigabit hacking event this past weekend hosted by Mozilla Ignite at the Internet Archive's building. I got to meet some interesting people and had a great time.

The general theme of the event was to try and demonstrate what kind of applications we can build when people's internet connections get really fast (e.g. gigabit). Since I work on federated 3D repositories with both the Sirikata project's Open3DHub, and also OurBricks, I wanted to  showcase applications that can be built with online 3D repositories and fast connections.

3D models can be quite big. Games usually ship a big DVD full of content or make you download several gigabytes worth of content before you can start playing. In contrast, putting 3D applications on the web demands low-latency start times. To showcase online 3D, I took the awesome ThreeFab project and added the ability to load files from an external repository.

For a demo:

  1. Visit http://blackjk3.github.com/threefab/.
  2. Click the "Import" button.
  3. Pick a 3D model from http://open3dhub.com/ and copy the "Direct Download" link box.
  4. Paste the link into the Import box.
  5. The model should load into the editor. (most models work)
The ThreeFab editor lets you export the scene you make. Here's a demo of a scene I created this weekend running on jsfiddle:

What's important to remember there is that all of the 3D content is being loaded asynchronously in the background directly from Open3DHub. The editor supports URLs from any site as long as they support CORS headers. As a result of the weekend, the Internet Archive is working on enabling these headers for its content, so hopefully we will be able to load 3D content directly from the archive soon.

Thanks to Mozilla and the Internet Archive for putting on a fun event!

Thursday, July 19, 2012

Automatic Debug Shell in Python

I've been working on a few long-running Python scripts lately. I find debugging to be difficult when a script takes a long time to run, since you don't get any feedback until execution hits the point in the code you're working on.

Python's awesome pdb module lets you drop into an interactive shell by calling the set_trace function. This is really useful because you can inspect local variables from the interactive shell. I found it tedious, though, to keep inserting these statements into my code, hoping it was in the right place, and wasting time when an exception was thrown somewhere other than what I was expecting.

I found a nice recipe that lets you drop into interactive mode as soon as an unhandled exception occurs. I created a gist that incorporates some changes from the comments. It only enters the interactive shell if the script has an appropriate TTY session, and if the exception is not a SyntaxError.

Here's an example script showing how to use it:
#test.py
import debug

def what():
   x = 3
   raise NotImplementedError()

if __name__ == '__main__':
   what()

And an example of using it:
$ python test.py 
Traceback (most recent call last):
  File "test.py", line 8, in <module>
    what()
  File "test.py", line 5, in what
    raise NotImplementedError()
NotImplementedError

> /home/jterrace/python-exception-debug/test.py(5)what()
-> raise NotImplementedError()
(Pdb) x
3

This is really nice for debugging, because it drops you to a shell that has all the local variables when the exception occurred.

Update
Yang pointed out the ipdb module. It looks awesome as an alternative to pdb and it comes with a method for doing this automatically.

Seamless Sharing

I uploaded an album yesterday of my recent trip to the ICME 2012 conference in Melbourne, Australia to Google+. I wanted to share a link to the album to Facebook, so I posted a link to the album. I was surprised that nothing popped up on Facebook for the preview, so I ran some experiments.

I created a public album on Google+, a public album on Facebook, and posted a public tweet with an image attached. I then shared each one on the other two social networks. I was surprised that the only one that actually showed content was sharing a tweet to Google+ and Facebook. Here's a grid showing all the results:

Comparison of sharing a photo/album across different social network. The rows are the source and the columns are the destination.
What's interesting is that other things do work. For example, I shared a link to a Flickr album, and it shows the content across all three networks. I'm guessing that maybe Facebook and Google+ don't have the proper Open Graph tags for the other networks to parse, but this really should be a seamless experience across networks.

Wednesday, July 11, 2012

Xvfb Memory Leak Workaround

I've been using Xvfb, the X virtual frame buffer, for a few projects. Xvfb allows you to run applications that require a display, without actually having a graphics card or a screen. I started noticing that the resident memory used by the Xvfb process would continually go up. I could literally run processes that connect to the display in a loop and watch the memory grow. Clearly, there was some kind of memory leak going on.

I finally found a workaround to preventing this memory issue. If you add -noreset to the argument of Xvfb, the memory issue vanishes. By default, when the last client to Xvfb disconnects, the server resets itself. My guess is that this works fine when video memory is backed by a hardware device, but Xvfb has a bug where it doesn't free the memory it allocated for the buffer. By setting the noreset option, the server no longer restarts and the memory isn't lost.

Here's my Xvfb command line:
Xvfb :1 -screen 0 1024x768x24 -ac +extension GLX +render -noreset

An explanation of the other arguments:

  • :1 - Runs the server on "display 1". Most X servers run on display 0 by default.
  • -screen 0 1024x768x24 - Sets screen 0 (the default screen) to a resolution of 1024x768 with 24 bits per pixel.
  • -ac - Disables access control because X access control is incredibly painful to get right, and since the server is usually only accessible from localhost, it's not a big deal.
  • +extension GLX - Enables the OpenGL extension, allowing graphics programs that use OpenGL to work inside the virtual display.
  • +render - Enables the X Rendering extension, enabling advanced image compositing features that most applications will need.
I also use a simple Xvfb start script. It's available as a gist.